7/22/13

Gifford's Campfire S'mores Ice Cream Recipe


My search for a copycat recipe of the s'mores ice cream we had in Maine was renewed when I found a carton of it at our local Fairway market. I bought it on the Fourth of July and we devoured it in a couple days. The thing about this ice cream was that it didn't have chunks of graham crackers in it (prone to getting soggy over time), the ice cream base itsself was graham cracker flavored. In searching online it was hard to find a s'mores ice cream recipe with a graham ice cream base; most of them had chocolate ice cream, or vanilla with s'mores mix-ins.

I found a graham cracker ice cream recipe and tried it out. It was a HUGE flop. The worst ice cream I've ever made. Seriously, it wasn't even like ice cream. It used too much milk to cream, didn't have eggs in it, and it came out icy and froze really hard so it couldn't even be scooped. It was terrible and we had to throw it out. The search continued!

I learned from the first failure that I needed a recipe with a cooked custard base to yield a more creamy ice cream that could stand up to the graham cracker crumbs. I did some research, comparing and contrasting lots of graham ice cream recipes from around the web, seeing how much of each ingredient they used, and trying to find one that had a good balance of cream to milk and a technique that would produce a creamy ice cream that didn't have too much powdery graham texture, but still a pronounced graham taste.

I found a recipe that looked like the best combination of what I was looking for, tweaked it a little and tried it out, adding my own shaved dark chocolate and marshmallow swirl. I was so nervous waiting for it to harden in the freezer, wondering if it would turn out how I was hoping. And it was INCREDIBLE!! It seriously tasted just like the Gifford's ice cream we had in Maine. I was so happy knowing I could make this any time I want. We served it to our friends at a dinner party that night and it was a huge hit! Everyone loved it. Sweet victory!


Gifford's Campfire S'mores Ice Cream Recipe

2 cups heavy cream
1 cup whole milk
3/4 cup granulated sugar
pinch of salt
5 large egg yolks
1 tsp vanilla extract
5 graham crackers, crushed into a powder
2/3 cup shaved or finely chopped dark chocolate
1/2-3/4 cup marshmallow creme (I drizzled until it looked good, not sure how much I used)


Put a glass bowl into the freezer to chill while you prepare the base. In a separate mixing bowl whisk together 5 egg yolks. Crush graham crackers in a ziplock bag. Be sure to grind them into as fine a powder as possible. You don't want any chunks.

In a sauce pan, stir together 1 cup cream, sugar, milk, salt and half of the crushed graham crackers. Heat over medium heat, stirring until all the ingredients are dissolved and the mixture steams and appears about ready to boil.

Temper the egg yolks. Slowly pour about half of the cream mixture into the eggs while whisking furiously (I use a hand mixer for this part). This warms the eggs without scrambling them. Once the hot cream and eggs have been combined, pour the egg mixture back into the sauce pan over low heat. Continue heating over low to medium low heat, until it begins to thicken slightly and coats the back of a spoon. (Good examples of what coating the spoon looks like can be found through Google images.) Remove from heat and stir in vanilla extract.

Grab the cold bowl from the freezer, and pour in 1 cup of cream. Pour the warm custard through a strainer into the cold cream, then whisk together. Cover the bowl with plastic wrap and refrigerate three hours or until completely chilled.

When you're ready to churn, stir the remaining crushed graham crackers into the custard base and freeze according to your ice cream maker's instructions. (Mine churns in the Kitchenaid for about 25 minutes.) After it's finished churning, transfer to a bowl and fold in drizzles of marshmallow creme and chocolate pieces. Freeze in an airtight container for 4-6 hours, until hard.

6/12/13

Toasted Marshmallow S'mores Ice Cream


On our trip to Maine, we had the best locally made s'mores ice cream at this little drive-in. It was insanely good. I knew I had to re-create it at home, especially because I wouldn't be able to get it since it's made in Maine. This ice cream was a happy accident as a result of my quest. It wasn't the same as the ice cream we had on our trip, but it was really great in it's own way.

Ice cream made from toasted marshmallows is blended with chunks of graham cracker and homemade fudge swirl to create an insanely rich, creamy and delicious ice cream experience. I loved this and will definitely make it again.


Toasted Marshmallow S'mores Ice Cream

For the Ice Cream:
1 (10-ounce) bag large marshmallows
1 vanilla bean
2 cups whole milk
5 egg yolks
½ cup granulated sugar
Pinch of salt
1 cup heavy cream
1 teaspoon vanilla extract

For the Fudge Swirl:
½ cup granulated sugar
½ cup water
1/3 cup light corn syrup
6 tablespoons Dutch-process cocoa powder
½ teaspoon vanilla extract

1½ cups coarsely chopped graham crackers

Make the Ice Cream Base:

Spread the marshmallows in a single layer on a parchment-lined baking sheet. Place them under the broiler for 30 seconds to 1 minute, or until toasted (keep a close eye so they don't start smoking!). Take them out and, using tongs, flip them over and pop them back under the broiler for another 30 seconds or so, until the other side is toasted. (Alternately, you can use a kitchen torch to toast them right there on the pan.) Set the marshmallows aside.

 Place the milk in a medium saucepan. Split the vanilla bean down the middle and scrape the seeds into the pan with the milk, then add the vanilla bean to the milk as well. Set the pan over medium heat and bring the mixture to a simmer.

 Meanwhile, whisk together the egg yolks, sugar and salt in a large, heatproof bowl. Slowly add the warm milk mixture to the egg mixture, whisking constantly. Pour the mixture back into the saucepan, using a rubber spatula to scrape the mixture from the bowl back into the pan. Turn the heat down to medium-low and cook, stirring constantly with the spatula, until the mixture thickens enough to coat the back of a wooden spoon (it should be between 170 and 175 degrees F on an instant-read thermometer).

Strain the custard through a fine-mesh sieve into a heatproof bowl. Let the mixture cool for about 15 minutes, stirring it every few minutes to help it cool down faster.

Put the toasted marshmallows in the blender, then pour the custard into the blender as well. Puree until the marshmallows are completely broken down and the mixture is smooth. Add the heavy cream and vanilla extract and blend again for about 5 to 10 seconds to combine. Pour the mixture into a bowl, cover with a lid or plastic wrap and refrigerate overnight.

 Make the Fudge Swirl:

Whisk together the sugar, water, corn syrup and cocoa powder in a medium saucepan over medium heat, whisking constantly, until the mixture begins to bubble at the edges. Continue to whisk until it just comes to a low boil. Cook for 1 minute, whisking frequently. Remove from the heat, stir in the vanilla and let cool. Chill in the refrigerator for at least 2 hours before using. It can be stored for up to 2 weeks, covered, in the refrigerator.

 Churn the Ice Cream:

Before churning, whisk the custard vigorously until it is smooth and has a pourable consistency (it will be a little spongy when it first comes out of the fridge). Freeze in your ice cream maker according to the manufacturer's directions.

When it's done churning, gently fold in the chopped graham crackers with a rubber spatula. Spoon some of the fudge swirl onto the bottom of the storage container. As you remove the ice cream from the machine, layer generous spoonfuls of the sauce between layers of the ice cream, ending with a top layer of ice cream. Do not stir the fudge into the ice cream, as it will make the ice cream muddy looking. Freeze until the ice cream is firm, at least 2 hours.

 Recipe from Brown Eyed Baker.

4/1/13

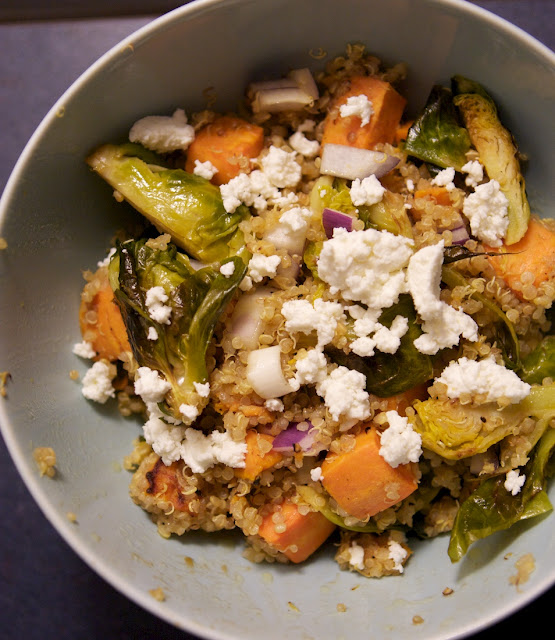
Quinoa with Brussels and Sweet Potatoes


I've been throwing goat cheese on everything lately. I randomly picked up a little container of it at the store on a whim. And I've discovered that it makes almost everything look and taste more gourmet. I love it!

So, one of those things was this quinoa dish. It was awesome. A product of wanting to use what I had i the house, and a little internet searching. Honestly you could throw any combination of roasted veggies with quinoa and yummy dressing and you'd be good to go. And if you can throw goat cheese on top? GOLDEN!


Quinoa with Roasted Brussels and Sweet Potatoes


1-2 large sweet potato, peeled and cut into 1 inch pieces
2 cups of brussels sprouts, cleaned and cut in half lengthwise
1/4 red onion, diced
1 1/2 cup cooked quinoa
Crumbled goat cheese (or feta)

Dressing:

1/4 cup olive oil
1 garlic clove, minced
1 tbs balsamic vinegar
1 1/2 tbs pure maple syrup (or maybe I used agave and maple extract? whatever.)
salt and pepper to taste

Preheat the oven to 450.
Toss the veggies with olive oil and salt/pepper to taste. Place the sweet potatoes on a cookie sheet, and the brussels and onion on another cookie sheet. Roast for about 15 minutes, or until the potatoes are tender and the brussels are crisp and browned. They may finish at different times, hence the two baking sheets.
Add the dressing ingredients to a jar. Shake well.
Toss quinoa, sweet potatoes, brussels and onion together in a bowl. Pour the dressing over and toss to coat. Sprinkle goat cheese on top, and it will melt delightfully into the dish as you eat it. Salt and pepper to taste. Serve warm.

Balsamic Pear Salad

Another salad I threw together the other night when we had the missionaries over. Sorry no photo, I was playing hostess. But this was amazing and everyone was "ooh"ing and "ahh"ing over it, so I ought to record it here so I don't forget about it!

salad greens (I used field greens)
thinly sliced pears
thinly sliced red onion
basic balsamic vinaigrette (everyone should learn to throw this together. once you see how easy it is you'll use it ALL THE TIME.)
candied walnuts (something else you should learn to do. so easy and so useful.)
crumbled goat cheese (just go buy it okay, you'll use it on everything. or substitute feta.)
salt and freshly ground black pepper

toss greens, pears, and onion with dressing. sprinkle salad with nuts and cheese right before serving.

Sweet Potato Caramelized Onion Pesto Pizza

Okay, so the iPhone photo is terrible. Don't worry, summer is coming. Which means I will have natural light with which to photograph my dinners. For now we're stuck with the light above the stovetop. Yikes.

Just trust me, this pizza was super tasty!


No-Knead Pizza Dough


3 3/4 unsifted cups all-purpose flour, plus more for shaping the dough
1/4 teaspoon active dry yeast
2 teaspoons salt
11/2 cups water


In a medium bowl, thoroughly blend the flour, yeast, and salt. Add the water and, with a wooden spoon and/or your hands, mix thoroughly. Start with the spoon, then switch to your hands.

Cover the bowl with plastic wrap or a kitchen towel and allow it to rise at room temperature (about 72°) for 18 hours or until it has more than doubled. It will take longer in a chilly room and less time in a very warm one.

Flour a work surface and scrape out the dough. Divide it into 3 equal parts and shape them by folding four edges toward the center. Shape each portion into a round and turn seam side down. Mold the dough into a neat circular mound. The mounds should not be sticky; if they are, dust with more flour.

If you don't intend to use the dough right away, wrap the balls individually in plastic and refrigerate for up to 3 days. Return to room temperature by leaving them out on the counter, covered in a damp cloth, for 2 to 3 hours before needed.


(in depth instructions and photos for dough found here.)


Sweet Potato Caramelized Onion Pesto Pizza

1 ball of no-knead pizza dough
1 sweet potato, peeled and sliced 1/4 inch thick
1/2 red onion, thinly sliced
1/2 cup prepared pesto sauce (i like costco brand or a quick homemade in the blender)
fresh mozzarella cheese (shredded is fine too if that's what you have)
olive oil
salt and pepper


Preheat oven to 450°.

Start the onions by heating 2 tablespoons olive oil in a skillet.  Place onions in skillet, sprinkle with salt and saute slowly over medium-low heat, stirring somewhat often, for about 15-20 minutes, until the onions have turned a rich, caramel brown.  Remove from heat and set aside.

While the onions are caramelizing, line a cookie sheet with foil. Place the sweet potato slices in a bowl and drizzle lightly with olive oil.  Toss, then place in a single layer on the prepared cookie sheet and season with salt and pepper.  Roast for 6 minutes, then flip and roast another 3-4 minutes. Remove from oven and set aside.

Dust your hands and work surface lightly with flour.  Working from the center of your ball of pizza dough, gently stretch & shape it to the desired size.

Bake the shaped pizza for about 5 minutes, then take it out for topping. Spread pesto sauce on pizza, then layer sweet potato slices, caramelized onions, and torn pieces of mozzarella cheese. Season with a little salt and pepper, and bake an additional 7-10 minutes, until crust is golden and cheese is bubbly.

Remove from oven and let cool for 5 minutes before slicing.

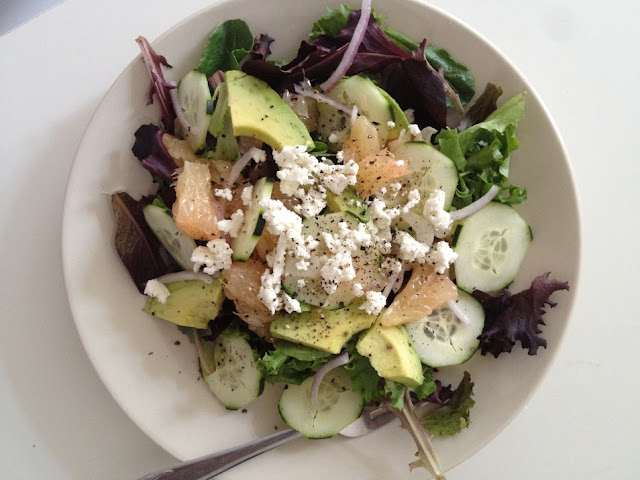
Grapefruit Avocado Salad

Just a little something I threw together the other day. ;)


-field greens (or other favorite salad greens)
-thinly sliced red onion
-sliced avocado
-sliced cucumbers
-chunks of grapefruit, peeled and membranes removed (time consuming but worth it)
-crumbled goat cheese
-salt and freshly ground black pepper

dressing:
-2 parts olive oil
-1 part lemon juice
-a drizzle of honey or agave to sweeten to taste

Vegetable, Lentil and Beef Soup


It doesn't sound like much, but this soup was actually really, really delicious. It was hearty and filling and just tasted really fantastic. It was very low effort with a very high return. We served this to guests with no-knead bread and a salad, and they all agreed it was the best dinner they'd had all week. I'll definitely be making this soup again.

Vegetable, Lentil and Beef Soup


1 pound lean ground beef
1 1/2 cups dry lentils, rinsed
1 cup chopped carrots
1 cup chopped onion
1 cup chopped celery
3 cups water
1 teaspoon salt
ground black pepper to taste
2 cubes beef bouillon cube
6 cups tomato-vegetable juice cocktail
1 (4.5 ounce) can mushrooms, drained
1 dash Worcestershire sauce


Brown beef; break meat into small pieces while cooking. Drain.

Place meat in a big pot with lid. Add lentils, vegetables, water, salt, pepper, bouillon, vegetable juice, mushrooms, and Worcestershire sauce. Cook on high until it boils. Reduce heat to low, and cover. Simmer for about 1 1/2 to 2 hours, or until lentils are tender. Stir occasionally.


Via Allrecipes.com.
Photo from Country Living.

No-Knead Bread


I cannot believe it has taken me this long to get on the no-knead bread train. I'm a little late to the party, I know. Well, the main thing standing in my way was that I didn't have an enameled dutch oven. (That's your cue to go over to Amazon and buy one for yourself. Go on! You deserve it!) Honestly, now that I know how amazing and effortless this bread is, I should have run out and bought one as soon as I first heard about this recipe years ago.

Anyway. All you need to know is that this is like fancy bread you'd get at some kind of european bakery, but it takes almost NO effort to make it. So, you should do it. I've included the white version (the tastiest) and the wheat version (the healthiest and still pretty dang tasty, for whole wheat).


No-Knead Bread

3 cups all-purpose or bread flour, more for dusting
¼ teaspoon instant yeast
1¼ teaspoons salt
Cornmeal or wheat bran as needed.

1. In a large bowl combine flour, yeast and salt. Add 1 5/8 cups water, and stir until blended; dough will be shaggy and sticky. Cover bowl with plastic wrap. Let dough rest at least 12 hours, preferably about 18, at warm room temperature, about 70 degrees.

2. Dough is ready when its surface is dotted with bubbles. Lightly flour a work surface and place dough on it; sprinkle it with a little more flour and fold it over on itself once or twice. Cover loosely with plastic wrap and let rest about 15 minutes.

3. Using just enough flour to keep dough from sticking to work surface or to your fingers, gently and quickly shape dough into a ball. Generously coat a cotton towel (not terry cloth) with flour, wheat bran or cornmeal; put dough seam side down on towel and dust with more flour, bran or cornmeal. Cover with another cotton towel and let rise for about 2 hours. When it is ready, dough will be more than double in size and will not readily spring back when poked with a finger.

4. At least a half-hour before dough is ready, heat oven to 450 degrees. Put a 6- to 8-quart heavy covered pot (cast iron, enamel, Pyrex or ceramic) in oven as it heats. When dough is ready, carefully remove pot from oven. Slide your hand under towel and turn dough over into pot, seam side up; it may look like a mess, but that is O.K. Shake pan once or twice if dough is unevenly distributed; it will straighten out as it bakes. Cover with lid and bake 30 minutes, then remove lid and bake another 15 to 30 minutes, until loaf is beautifully browned. Cool on a rack.

Yield: One 1½-pound loaf.


Whole Wheat No-Knead Bread


4 cups whole wheat flour (I used King Arthur White Whole Wheat Flour)
2 cups water plus 3-4 tablespoons water  (adjust depending on the consistency of the dough. Yes, 1 tablespoon can make a huge difference.)
2 teaspoons salt
½ plus 1/8 teaspoon yeast


1) Mix all the ingredients in a bowl just until they are thoroughly mixed. Cover the bowl with plastic and set the bowl aside for 12 to 18 hours.

2) After the first rising, lightly flour the counter top and use a spatula to remove the dough from the bowl and put it on to the counter top. Fold the dough over on itself from left to right, turn the dough 90° and fold it again. Lightly shape and dough into a ball and place it on a well-floured tea towel. Fold the towel flaps over the dough to cover, and let it rise for an hour and a half.

3) Allow the dough to continue rising on the counter top while you heat the oven. Turn the oven temperature on to 475° and put the covered pot into the oven. Let the pot and the oven warm for 30 minutes.

4) Take the pot out of the oven, remove the lid and slide the dough off the tea towel into the pot. Cover the pot, place it back in the oven and set the timer for 30 minutes.

5) After the 30 minutes is up, remove the lid from the pot. Set the timer for another 15-20 minutes and continue cooking the bread until the top is browned to your liking.

6) Take the pot out of the oven and use a large spatula to remove the bread. Let it cool on a cookie rack about 15 to 20 minutes before cutting into it. Waiting to taste it is the hardest step in the whole recipe, but if you cut into the bread too early it will not finish cooking properly.


Recipe from Jim Lahey via the NY Times.

Whole wheat adaptation via My Healthy Eating Habits.

3/2/13

Healthier Peanut Butter Banana Cookies


{post-edit 3/4/13: Sincerest apologies to anyone who tried this in the past two days and ended up with gooey cookies (I'm looking at you, Justin!). I have now re-tested the recipe and adjusted the amounts accordingly. It's perfect now, I promise!}

Now that I'm on this 'healthy cookie' kick, I've been experimenting in the kitchen. I came up with this recipe today and thought it was worthy of sharing.

These cookies are a little higher in calories, fat and sugar than the ones posted below, but that is only because of the addition of peanut butter. You could make them quite a bit healthier by using almond butter. So I know they're still cookies, and are a treat, but if compared to a traditional peanut butter cookie, which is full of butter, sugar, and refined flour, this is leaps and bounds healthier. These are whole grain, have no refined sugar and no butter, and the only sweeteners are banana and honey. So it's kind of like eating a peanut butter and banana sandwich, but with less bread...? Just make them, they're guilt-free cookies!

Healthier Peanut Butter Banana Cookies

1 1/4 cup quick oats
1/2 cup whole wheat flour
1 tsp baking powder
1/2 tsp cinnamon
1/4 tsp salt
3 ripe bananas
1/2 cup peanut butter (I prefer crunchy)
1 1/2 Tbs honey
1/2 tsp vanilla

Preheat oven to 350, and spray a baking sheet with cooking spray (or line with parchment paper, my favorite). Mix dry ingredients in a bowl, set aside. Mash up bananas with a fork and stir them until smooth with few lumps. Stir in peanut butter, honey and vanilla until mixture is smooth. Stir in dry ingredients. Batter should be moist and sticky (this is more of a batter than a hard dough), but not runny. Drop by rounded tablespoonfuls onto prepared baking sheet, flatten out slightly with your fingers. Bake for 11-12 minutes.

I like to sprinkle with a little kosher salt as soon as they come out of the oven. These are delicious served warm, but after a few hours the flavors meld together and they're still really tasty! They should keep just fine in the fridge for a few days.

makes 20 cookies

2/28/13

Healthy Banana Oatmeal Cookies


This recipe has changed my life. Seriously. The past seven weeks I've adopted a new healthy lifestyle, cutting out refined grains and added sugars, and eating more fruits and vegetables. And these cookies are still totally legal. You can make them and eat the entire batch for breakfast and not even feel bad about it (that's what I just did, actually). Nutritionally, this is like eating a hearty bowl of oatmeal, minus the milk. These totally satisfy my craving for a warm, soft, chewy cookie with absolutely none of the guilt after I eat six of them. I am so happy about this I want to sing!

The other nice thing about this is it's totally adaptable. You can put whatever you want in them. The first time I made them I only used a banana, oats and chopped walnuts and they were still good!

Are you ready for the best part? If you make these as described below and eat the entire batch, it's only about 400 calories (a perfectly acceptable breakfast, if you ask me). The walnuts also add essential omega 3 fatty acids, and you're getting a serving of fruit from the banana, and whole grains from the oats. Leave out the add-ins and you're at about 240 calories. I know. I know. You can thank me later.

Healthy Banana Oatmeal Cookies

Cookie base:

1 ripe banana, mashed
1/2 cup plus 2 Tbs quick oats

The above ingredients are actually all you need, but I added a few extras:

dash of salt
splash of vanilla
2 Tbs chopped walnuts
1 1/2 Tbs craisins
1 1/2 Tbs shredded coconut

Preheat oven to 350 degrees. Stir together ingredients. Form into cookie shapes and place on a baking sheet lined with parchment paper or sprayed with cooking spray (they will stick if the pan is not well-sprayed). These don't change shape, puff or rise while baking, so form them into the shape you want them to end up. Bake for 12-15 minutes. Makes six or seven cookies.

2/6/13

Asian Bell Pepper Soba Noodle Salad

I had some bell peppers on hand and had a stroke of genius and decided to make them into a salad using soba noodles. I LOVE soba noodles. They're whole grain and they are so tasty. I loved how this salad turned out.

Asian Bell Pepper Soba Noodle Salad

6 oz soba noodles, cooked and chilled (run cold water over after cooking)
3 bell peppers, red, yellow and orange, sliced thin
2 green onions, chopped
1 cup broccoli florets, chopped small
1/2 cup sugar snap peas
4 cups baby spinach

Dressing:
1 whole Lime, Juiced (1 Tbs bottled lime juice)
1/2 cup Olive Oil
1/2 cup Soy Sauce
2 Tablespoons Sesame Oil
1/3 cup honey or 2 Tbs Agave nectar
3 Tablespoons Fresh Ginger Chopped
2 cloves Garlic, Chopped

Mix up the dressing, pour it over everything else. YUM!

Curried Butternut Squash Apple Soup


I love the addition of curry powder but if you're not a fan you could reduce it. This recipe made a TON of soup. I took some to a friend and her family for dinner and had plenty leftover for myself. If you're not cooking for a crowd, half it.

Curried Butternut Squash Apple Soup


  • 2 tablespoons unsalted butter
  • 2 tablespoons good olive oil
  • 4 cups chopped yellow onions (3 large)
  • 2 tablespoons mild curry powder
  • 5 pounds butternut squash (2 large)
  • 1 1/2 pounds sweet apples, such as McIntosh (4 apples)
  • 2 teaspoons kosher salt
  • 1/2 teaspoon freshly ground black pepper
  • 2 cups water
  • 2 cups good apple cider or juice

  •  
    Warm the butter, olive oil, onions, and curry powder in a large stockpot uncovered over low heat for 15 to 20 minutes, until the onions are tender. Stir occasionally, scraping the bottom of the pot.
    Peel the squash, cut in half, and remove the seeds. Cut the squash into chunks. Peel, quarter, and core the apples. Cut into chunks.
    Add the squash, apples, salt, pepper, apple cider and 2 cups of water to the pot. Bring to a boil, cover, and cook over low heat for 30 to 40 minutes, until the squash and apples are very soft. Process the soup with a blender. (I used my blendtek and it worked great. Just don't over-fill it - you don't want hot soup splattered all over your kitchen. And wash it out right after. I let my blender soak overnight and it is now stained orange. Great.)
    Pour the soup back into the pot. It should be slightly sweet and quite thick. Check the salt and pepper and serve hot.

    Thanks, Ina.